Monday, July 30, 2012

A Sentimental Journey...

Monday morning Greetings to al! I'm on Blog Street again to share two new creations for Simon Says Stamp & Show! Mondays mean a new challenge theme and this week it's all about "Your sentiments".
Well, who doesn't have a few of those in the old stash then??? Good old words and sentiments. "Easy to stamp, harder to abide by..." I always say, but we all seem to love them!
Now this is a scheduled post from end May, so by the time you read it, it'll be a bit of a time-warped one. These cards were/are (?) the last project of my huge pre-baby DT boot camp marathon. Lots of relief, fatigue and pride knowing 'all is done!' Mojo has now gone a go-go...

So admittedly, I didn't want to dive into anything too complex or demanding. But with Sarah being Sarah, I still wanted to create something I was happy with.
Flicking through luscious thick pages of Design Paper is all very well, but like a car stuck in a garage - it sure ain't going anywhere!!!
Inspired by the wonderful vintage colours and  images from Tim's Destination Paper Stash, I decided on two cards that incorporated a feeling of nostalgic travel. I started by picking a few of my favourite snaps from the collection. 
l also used the papers for my card bases as I thought that would be a nice colourful and unexpected surprise on opening the card. I added an aged and stamped tag to the inside so that you can write a personal message...
The first card is about the sun, sea and cruises and the second auto-mobiles, road trips and visiting family....
I choose two photos and a handful of snippings for each card, distressing and inking them to create an aged look. Can't survive without Vintage Photo and Walnut Stain Distress inks! I also stamped the card fronts with the City and street stamp from the Papillon set.
I played around with the composition and layers for a while to see what looked best and then stuck it all down. I added a wrap of parcel string and a couple of buttons to add a bit more texture and depth.
Here's another inside shot - the tag is stamped with the ticket stamp from Tim's 'On the Railroad' set and splattered with ink.
I added a small tag to the string and stamped my Attic Treasures sentiments in Ranger Sepia Archival ink. Very small and dinky stamps, just perfect for these little tags.
I set out to do something simple, yet ended up having as much fun as always - and I love both my cards... I think vintage photos and sentiments go hand in hand! So which words will your inky fingers be reaching for? Pop over to the Design Team Blog for more inspiration! Do join in and maybe you could be the Happy Shopper with this generous $50 prize voucher from Simon Says Stamp or one of our top three chosen artists...!
Thanks for calling in today. Sarah signing off - and until whenever....!

Monday, July 23, 2012

One for the Girls...

All the single ladies.. all the married ladies... all the happy ladies... all the moody ladies...! 'Tis another Monday morning and I'm here with my new piece for Simon Says Stamp & Show where it's a HEY GIRL thing! Girl power, femme fatale or delectable damsel... Take your pick!
For some obscure reason I felt a compendium of bright inks and circles in the offing... a shape I don't really use that much. I like doing 'threes' of things but I didn't want to do tags or an ordinary card and when I remembered my Bubbly Circle background stamp from Wendy, it all came together!
I also wanted to give my Ranger Specialty Stamping Paper a test run to see how it took to a good dose of embossing and inkiness! I started out with a whole sheet of the paper and clear embossed the circle background over the whole surface.
Then I randomly sprayed patches of Vibrant Turquoise, Bubblegum Pink and a little Fresh Lime Dylusions inks on top. I dried the surface and then went in again with the same colours but this time I sprayed through punchinella. I got a really nice kind of water mark effect! I wanted to bring out the clear embossing so I lightly buffed the surface which also blended the colours slightly too. I cut three large circles and stuck them to corrugated cardboard.
I added a few splatters of Black Marble ink and also stamped the fabulous Wrought Iron Border in Jet Black Archival Ink. I heat set it all well to prevent smudges as the ink does stay a little wet due to the paper's special coating. It's a great paper and can take a lot of action! I stuck old dictionary pages to card, stamped three of Wendy's Art Rules girls and cut them out, adding a touch of colour to their features.
I wanted to give the girls a bit more oomph in the head-wear dept. so I stamped the larger flower from the same set onto card, added an upholstery stud to the centre and layered them onto the faces.
Same idea with the starry eye - except I embossed it with black powder for a glossy look!
I stuck the ladies to the circles, adding a few words cut from other sentiments and added washers coloured with Alcohol Inks in the same tones. The circles also have a washer base to help them stand and are joined together with a small cardboard hinge. Voila! An alternative greeting card!
I hope you like the bright colours and dramatic black... I'm loving the combo! One for the girls is a really great theme - there's so many ways you could go with this one so I'm really looking forward to seeing what everyone comes up with! Who will make he top three this week or win this great $50 shopping voucher???
Thanks calling by and taking a look - stay inspired!
See you soon,
Sarah.

Wednesday, July 18, 2012

WOYWW?

Hello and Wednesday WOYWW greetings to all! Although I feel I have lost all track of time and the specific days, 'this' time of the week has - yet again - appeared from nowhere and so I suddenly grabbed the camera to document the shabby state of affairs in La-De-Dah Land. So behold, my desk a mid flow and the beginnings of something...left in limbo due to heavy duty nappy runs...
Hubby is in France for a week so my spare time is very itty bitty indeed. Just minutes at the moment it seems. But I have made a deal with myself to still join in with WOYWW and make it the'me' moment of the week. So, it's a fleeting table. Yet I felt a start on something crafty,  however small, was worth it... Starting to gain a bit more mama confidence and adjusting to the skinny, sleepless nights. Kind of. Roll on teacher hubby's summer holiday!
I'm still be showered with luuurve, gifts and kindness and as promised here are the two wonderful, uber-gorgeous bibs from Jozart...don't ya just love them...? THANK YOU! Just so pretty and creative. Ruby will have to brush up on her table manners!
Two fabulous cards from bloggy friends Susan and Sandee! I have received SO many cards and have them all on display on my baby cupboard in the nursery which looks great.

Also an amazing box of girly loveliness from my so very generous DT friend Candy. A million thanks and wowzers!

I was totally overwhelmed and so surprised by the wonderful wardrobe...

Ballet, cats, frills, dots, flowers, bows and rock chick animal print! Ruby is going to be one sassy well-dressed lady!
Just time for another ten minutes of inky escapism - so a tag is the ideal playground and a chance to try out the Summer Distress Inks. Oooooh! You are perky fellas indeed and, one day..., I promise to play with you all day!
Today I t was just a bit of ink & flick stuff which is the Tim theme at COC2 over at Linda's. Dug out some old, closest to hand stamps... and splatted and stamped without a thought!
 PO
"Sugar and spice and all things nice... that's what little girls are made of..." Guilty. I lost all my "I'll never do all that girly stuff" feelings the moment she appeared. Big thanks to everyone for the continuing support and encouragement. Leaving you with a little puff of pink happiness.
Sarah x.

Monday, July 16, 2012

Anything Goes!!!

Good morning and welcome to La-De-Dah on yet another "what happened to the weekend?" Monday morning...! I'm really glad that's it's an "Anything Goes!" theme at Simon Says Stamp & Show this week because whatever your creative mood, style or passion, you can join in and show off your artwork... Ready for lots of flowery pics...here we go!
It didn't take me long to dive into my 
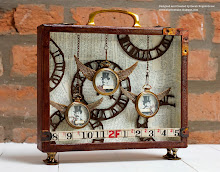
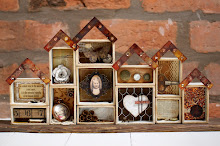
Wendy Vecchi suitcase, pull out some goodies and have my very own Art Parts Party! I did my usual thing of laying them all out on my desk and experimenting with ideas... A few months ago I created an altered piece for Craft Stamper magazine with the Artful Shrines and I fancied trying out a new modern, flowery version of it.
l started by colouring the two shrines with Fired Brick Distress Stain and then stamped them with the number stamp in Coffee Archival ink. I cut one of the shrines in half so I could glue it to the other to create a dimensional summer house. Then I set it on a large flower and glued the leaves inside the base. I had sprayed the leaves and flower with Dylusions Spray ink for a blast of colour.
I could kind of see in my mind how I wanted things to turn out so when I was eventually done it seemed that this 
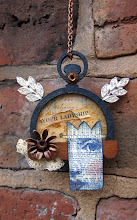
sentiment was the perfect fit! Then I set to work on colouring and stamping the flowers....
More Cut Grass Dylusions for the stems, white Claudine H white paint on the heads and then Wendy stamps in Ranger Monarch Orange or Saffron Yellow Archival inks. A little Distress ink on the petals and a washer for the centres. It's a tough piece to shoot, but hopefully you can see my whimsical house. I used lots different of smaller Art Parts including a frame piece,
a scallop, wings and mini-flower. I covered the scallop with a book page coloured with Rusty Hinge Distress ink. I added Tim's Idea-ology Ruler Ribbon, a Time-piece and spinner. The triple wings were a happy accident. I was a bit wild with my Dylusions spray and the extra wet ink caused them to split into three. So I thought, well, colour them all!
The flowers are stuck to the base, house back and leaves and have been trimmed slightly to vary the height and get a straight edged bottom. Glossy Accents, a firm hold and patience are a necessity!
Of course if there's flowers then a 
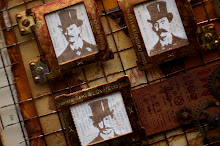
flutterby is not far behind so I stamped a couple of double layered butterflies onto design paper and set them on the base...
and on the top which I had adorned with two floral Art Parts and metally bits. The big Dots are an old background stamp of mine and the smaller polka dots come from this set.
I think my Art Parts tour is over... hope you enjoyed the journey. Maybe the sentiment on my house will inspire you too. So just start imagining and creating! Remember it's ANYTHING GOES! Great fun and there's also the fab $50 voucher to be won. Thanks for calling by...
Sarah.