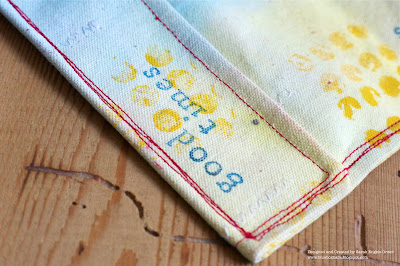
There is still one phenomenon yet to be measured by science. That being the unknown depths of a woman's bag... With that in mind and the great new Passport theme over at Simon says Stamp & Show, I decided to combine my love of sewing and crafting and came up with a bright and funky passport holder.
I started out with some medium weight artists canvas which you can get from a good fabric store. I cut two 6.5 by 12.5 inch pieces and then prepped them with a wash of gesso so I would have a base for the colour.
You do need a gesso base coat otherwise the paint will just sit on your fabric and not take. It's best to let it dry naturally as drying with a heat gun can cause shrinkage. Then I applied a watered down mix of Distress Paint to create the colour, using sweeping strokes and the widest brush from Claudine Helmuth's fabulous set. Keep the brush wet and keep the paint moving. Blend, blend, blend...!
When dry, I added some random zig-zag stitching to both pieces, then I stitched the pieces together (right sides together) around the edge, leaving a 3 inch gap for turning. Trim the seams and corners, turn right sides out and iron well. I then top stitched around the edges using red thread. My machine was having a wobbly day and so I went with the rustic look! Turn in two inches either end to the inside to create the inner flaps, press and then stitch twice around the whole piece again. Hey presto, a passport holder!
Then the fun part come when you can add whatever you want. I thought a few stamped dots broke up the background and then I went for these yummy Wendy flowers and leaves. They are stamped onto sticky back canvas with Archival Ink and then coloured with Distress Inks.
I finished off with a little chain stitching on my flower (taking care not to stitch through both layers which fiddly but doable!) Then lots of holiday inspired stamped words to add some flavour. At this point I accidentally dropped my holder onto an blue ink pad. Not funny. But with a bit of a scrub, some repainting and edging I kind of hid it. Phew!
Okay, so it's not Haute Couture, but it was fun and hopefully I will be
able to find my passport in a flash on my next little gettaway!
Passports is a really fabulous challenge theme - full of inky potential... Check out the really wonderful ideas from
the rest of the Design Team here! We are on the hunt for our top three artists and there is this very generous $50 voucher to be won too. Do join in and share your art with us.
That's me all done for today. Have a good week y'all!!!!
Sarah.
Monday, April 29, 2013
Monday, April 22, 2013
Gotta get me some colour...
Hello again. Well, the title says it all... This week at Simon Says Stamp & Show we are in full blown colour and are having fun with all they have to offer. So if you have had a rather dull or unexciting weekend, spice up your week with a blast of feel good, colourful creativity.
There are just so many wonderful products, mediums and shades to play around with so where better to try them all out that in my Art Journal. The poor thing. It is a bit dusty at the moment - and so am I! So I decided it was time for some creative therapy for both of us.
Except for my stamped words on the second page, I didn't use a single ink pad. I pulled out my Distress Paints and Stains, Gesso, Color Washes, Dylusions Ink Sprays and pens. Lots of layers, texture, contrast and free-styling! Some of my outlining went a bit wild but I left it as an "of the moment thing"...
I just kept playing with layers of shapes, colours and effects, seeing what happened each time. There is no right or wrong... only exploration and discovery. I used stencils (bought and home-made) for sharper shapes or patterns and combined them with splats, dribbles and squiggles.
I also used oodles of gesso - big swooshes as well as lines created with a credit card edge... I added some paper scraps and a heart from an old book page. I even jumped over to the sewing machine for some stitched fun too.
The thoughts are a mix of newspaper cuttings and stamping... My little gal, Ruby, is now 10 months old and she is on the go ALL day long. Nothing is safe any more and domestic life is very full on here in Chez Engels. But I want to embrace the everyday busyness and be thankful for all that each day has in store for us. This is real life, not a rehearsal, so grab it with both hands.
And indeed, learn to love it! I am sure everyone could do with some colour in their life, not just their craft room! Check out the really wonderful colourful ideas from the rest of the Design Team here! We are on the hunt for our top three artists and there is this very generous $50 voucher to be won too. Back to the real world I must go...With that, she was away.
Enjoy your week and thanks for calling by. Sarah.
Monday, April 15, 2013
Backgrounds to the front please!
Monday again! I think I must have tripped and fell into a time warp on Friday night because I sure don't know where the weekend went to. Monday morning also means a fresh new challenge theme over at Simon Says Stamp & Show where good old 'background stamps' are in the spotlight. I'm a huge fan of background stamps and can't get enough of them.
I was very glad to have a chance to play with my new Distress Paints and see how they performed. Yippee, something new, as full time mummy duty leaves me very little time to try out new stash. Oooh, I'm feeling all trendy.
I started my experimenting with colours and effects and I have to say I luuuuurve the paints. They are so vibrant, versatile and fun. I must also add that you really only need a little bit of paint to create a great blast of colour, so if you are thinking you'll use them up too quickly, let me tell you no!
I actually was too generous and could have swooshed at least twenty tags with my left overs. Steady on next time Sarah. When you spritz them with water they really move and wick in a great way but retain their intense colour.
I worked with Ranger Specialty Stamping Paper which is coated so my paints really moved. In fact, I decided to play with the paints on a larger piece of paper and then I cut my tags from my favourite part. I dried them well and then in comes the background...
l used just a section of Tim's Grunge Alphabet, also stamping in Distress Paint. By using just a part of the stamp and rolling it across the tag without an acrylic block, you can achieve some great effects. I do this a lot. It is a great way of getting more out of your stamps, especially if you are into art journalling too. I have also done this with the eyes on the first tag by masking off the bottom section.
I stamped the faces and eyes in Jet Black Archival Ink which you need to get that crisp, permanent image. Be sure to heat set as ink does take longer to dry on Specialty Stamping Paper. I added a little Distress Ink around the edges and then headed to my typewriter to create the wording which just came into my head whilst I was busy.
I wanted a little extra dimension and felt a butterfly fitted the mood. I refrained from lots of extra stamping and just decided to let the colours and images do the talking (she says, rambling on here...)
So there you go lots of colour, painty love and a guest appearance from the background stamp. It's a great theme and I am sure everyone has a background stamp! Check out the really wonderful ideas from the rest of the Design Team here! We are on the hunt for our top three artists and there is this very generous $50 voucher to be won too.
With that, I am away... until the next time!
Sarah
I was very glad to have a chance to play with my new Distress Paints and see how they performed. Yippee, something new, as full time mummy duty leaves me very little time to try out new stash. Oooh, I'm feeling all trendy.
I started my experimenting with colours and effects and I have to say I luuuuurve the paints. They are so vibrant, versatile and fun. I must also add that you really only need a little bit of paint to create a great blast of colour, so if you are thinking you'll use them up too quickly, let me tell you no!
I actually was too generous and could have swooshed at least twenty tags with my left overs. Steady on next time Sarah. When you spritz them with water they really move and wick in a great way but retain their intense colour.
I worked with Ranger Specialty Stamping Paper which is coated so my paints really moved. In fact, I decided to play with the paints on a larger piece of paper and then I cut my tags from my favourite part. I dried them well and then in comes the background...
l used just a section of Tim's Grunge Alphabet, also stamping in Distress Paint. By using just a part of the stamp and rolling it across the tag without an acrylic block, you can achieve some great effects. I do this a lot. It is a great way of getting more out of your stamps, especially if you are into art journalling too. I have also done this with the eyes on the first tag by masking off the bottom section.
I stamped the faces and eyes in Jet Black Archival Ink which you need to get that crisp, permanent image. Be sure to heat set as ink does take longer to dry on Specialty Stamping Paper. I added a little Distress Ink around the edges and then headed to my typewriter to create the wording which just came into my head whilst I was busy.
I wanted a little extra dimension and felt a butterfly fitted the mood. I refrained from lots of extra stamping and just decided to let the colours and images do the talking (she says, rambling on here...)
So there you go lots of colour, painty love and a guest appearance from the background stamp. It's a great theme and I am sure everyone has a background stamp! Check out the really wonderful ideas from the rest of the Design Team here! We are on the hunt for our top three artists and there is this very generous $50 voucher to be won too.
With that, I am away... until the next time!
Sarah
Subscribe to:
Posts (Atom)